
> For the complete documentation index, see [llms.txt](https://docs.scepman.com/llms.txt). Markdown versions of documentation pages are available by appending `.md` to page URLs; this page is available as [Markdown](https://docs.scepman.com/certificate-management/static-certificates/google-workspace/chromeos.md).

# ChromeOS

This document describes deploying a device and/or user certificates for ChromeOS devices. The deployment of the SCEPman Root Certificate is mandatory.

{% hint style="danger" %}
**Google is retiring legacy SCEP for ChromeOS.** Google has announced that the legacy SCEP API used for ChromeOS certificate enrollment will be retired by the end of 2026, in favor of the new **ChromeOS Certificate Provisioning API.**

Certificates already issued via SCEP will remain valid until they expire, but cannot be renewed once the legacy API is retired. SCEPman support for the Certificate Provisioning API will be covered in a separate guide once available.

For details, see [Google's ChromeOS certificate enrollment documentation](https://support.google.com/chrome/a/answer/11338941?hl=en).
{% endhint %}

## Root Certificate

As a first step, you must deploy SCEPman's root certificate. Therefore, follow these steps:

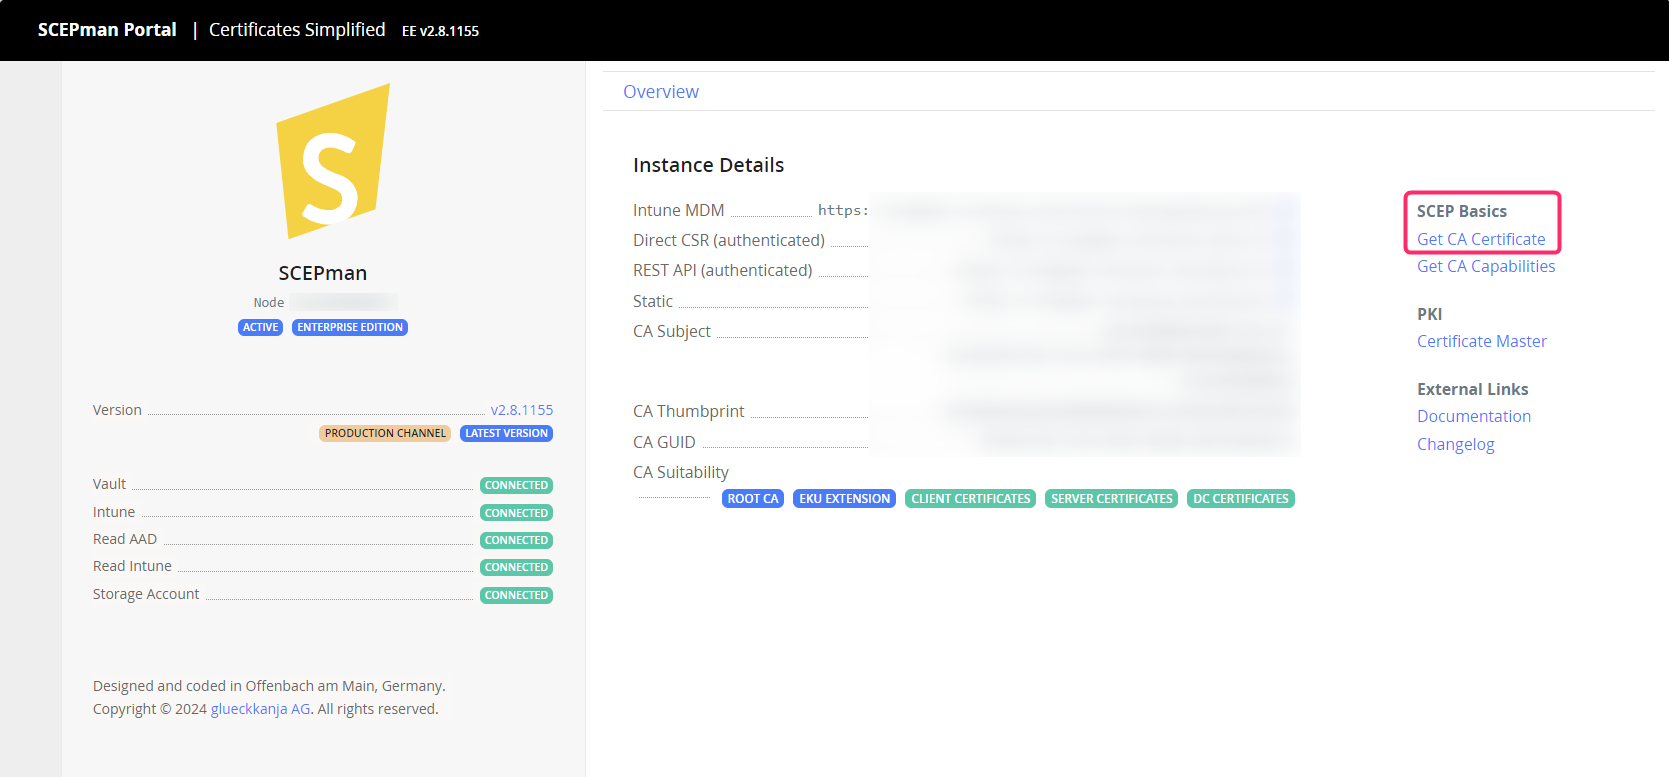
1. Download the root CA certificate from your SCEPman website by clicking on the **Get CA Certificate** link.

<figure><img src="https://2535731700-files.gitbook.io/~/files/v0/b/gitbook-x-prod.appspot.com/o/spaces%2F-LoGejQeUQcw7lqnQ3WX%2Fuploads%2FUSSdLPzo78nIZ5T38WQS%2Fimage.png?alt=media&amp;token=7da8cc67-d00e-4e1e-b5be-69c439c8abc7" alt=""><figcaption></figcaption></figure>

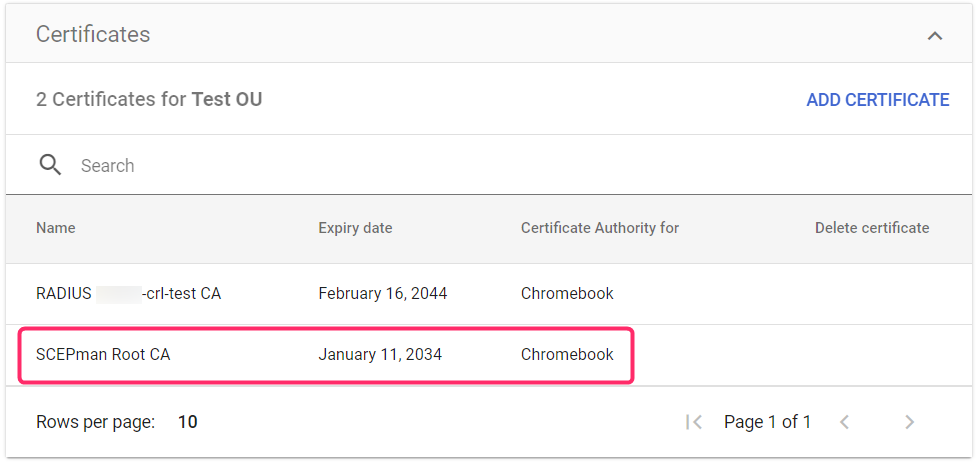
2. Now upload your SCEPman root CA to your Google Workspace. In your Google **Admin console** (admin.google.com) navigate to **Menu** > **Devices** > **Networks** > **Certificates** > **ADD CERTIFICATE**

{% hint style="warning" %}
Be aware that the Google Admin console only accepts certificates in PEM format. You will need to convert SCEPman root CA (which is downloaded in DER by default) using *openssl* or by importing it in Windows and exporting it again in Base-64 format.
{% endhint %}

<figure><img src="https://2535731700-files.gitbook.io/~/files/v0/b/gitbook-x-prod.appspot.com/o/spaces%2F-LoGejQeUQcw7lqnQ3WX%2Fuploads%2FtcnmwZHCReIR6tiimrI8%2Fimage.png?alt=media&amp;token=2c3a577d-f7a2-4ee2-856b-388ff185b736" alt=""><figcaption></figcaption></figure>

## Add a SCEP Profile

The SCEP profile defines the certificate that lets users access your WiFi. Assign the profile to specific users by adding it to an organizational unit. Set up multiple SCEP profiles to manage access by device type. The following configuration example

1. In your Google **Admin console** (admin.google.com) navigate to **Menu** > **Devices** > **Network**
2. Click **Create SCEP Profile**.
3. Click **Add Secure SCEP Profile**.
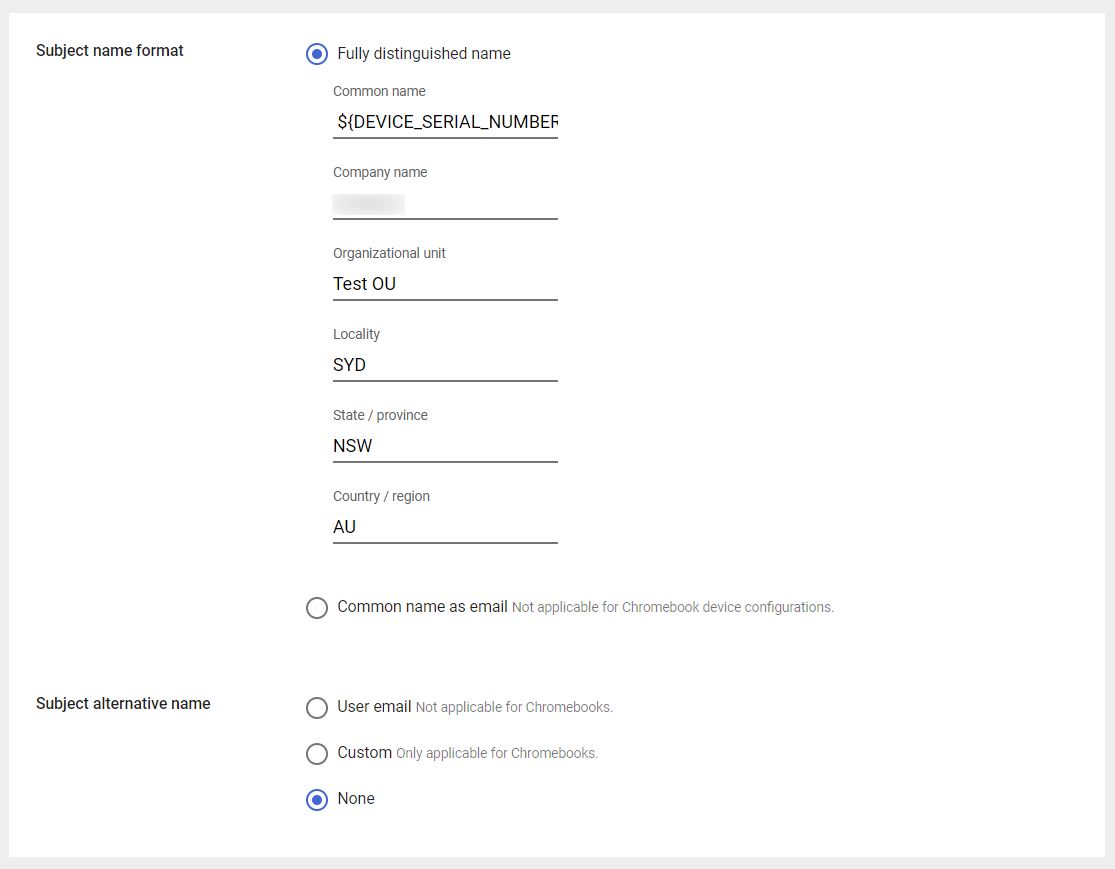
4. Enter the configuration details for the profile.

| Attribute            | Value (Device)      | Value (User)      |
| -------------------- | ------------------- | ----------------- |
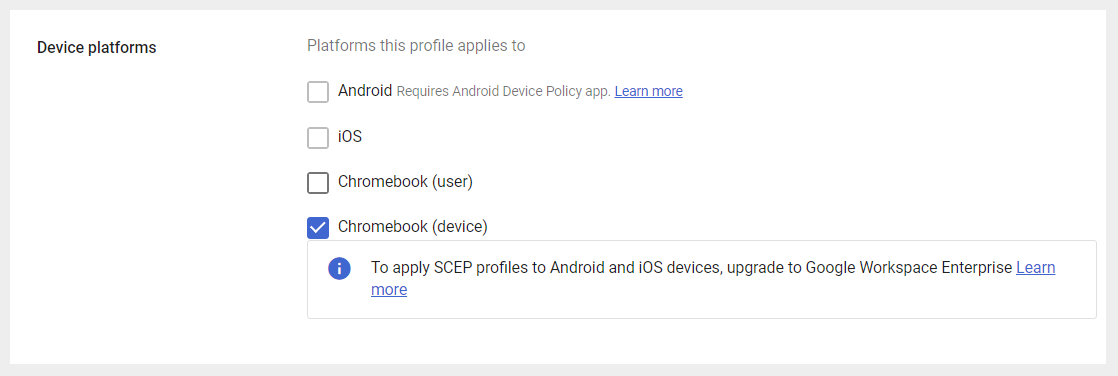
| **Device platforms** | Chromebook (device) | Chromebook (user) |

<figure><img src="https://2535731700-files.gitbook.io/~/files/v0/b/gitbook-x-prod.appspot.com/o/spaces%2F-LoGejQeUQcw7lqnQ3WX%2Fuploads%2FiAwqjhjMygfRZmYAaK5M%2Fimage.png?alt=media&amp;token=25a10837-b43f-42fe-a14a-813cfabe79e5" alt=""><figcaption></figcaption></figure>

| Attribute             |                                       |
| --------------------- | ------------------------------------- |
| **SCEP profile name** | Provide a name for your SCEP profile. |

<figure><img src="https://2535731700-files.gitbook.io/~/files/v0/b/gitbook-x-prod.appspot.com/o/spaces%2F-LoGejQeUQcw7lqnQ3WX%2Fuploads%2Fx7zWmbc8P1wU1cZHHb29%2Fimage.png?alt=media&amp;token=1434eed7-9396-471b-95ad-7b8fbd80b8a9" alt=""><figcaption></figcaption></figure>

<table><thead><tr><th width="246">Attribute</th><th width="282">Value (Device)</th><th>Value (User)</th></tr></thead><tbody><tr><td><strong>Subject name format</strong></td><td><strong>Fully distinguished name</strong></td><td><strong>Fully distinguished name</strong></td></tr><tr><td></td><td><strong>Common name</strong>: ${DEVICE_SERIAL_NUMBER}</td><td><strong>Common name:</strong> ${USER_EMAIL}</td></tr><tr><td></td><td><strong>Company name</strong>: Your company name.</td><td><strong>Company name</strong>: Your company name.</td></tr><tr><td></td><td><strong>Organization unit:</strong> Your organizational unit. This is optional.</td><td><strong>Organization unit:</strong> Your organizational unit. This is optional.</td></tr><tr><td></td><td><strong>Locality</strong>: Your organization unit's location. This is optional.</td><td><strong>Locality</strong>: Your organization unit's location. This is optional.</td></tr><tr><td></td><td><strong>State</strong>: Your organization unit's state. This is optional.</td><td><strong>State</strong>: Your organization unit's state. This is optional.</td></tr><tr><td></td><td><strong>Country / region</strong>: Your organization unit's country. This is optional.</td><td><strong>Country / region</strong>: Your organization unit's country. This is optional.</td></tr><tr><td><strong>Subject alternative name</strong></td><td>Default: <strong>None</strong><br><br>This can be set to <strong>Custom</strong> when the SAN shall be used, e.g. as outer identity when authenticating to a WiFi using EAP-TLS.</td><td><p><strong>Custom</strong></p><p><strong>User Principal:</strong> ${USER_EMAIL_NAME}</p></td></tr><tr><td></td><td></td><td></td></tr></tbody></table>

<figure><img src="https://2535731700-files.gitbook.io/~/files/v0/b/gitbook-x-prod.appspot.com/o/spaces%2F-LoGejQeUQcw7lqnQ3WX%2Fuploads%2F5fbEgC2k7DFCRIwPoKgZ%2Fimage.png?alt=media&amp;token=b8c29965-37be-4f8f-a05b-e48cee55de51" alt=""><figcaption></figcaption></figure>

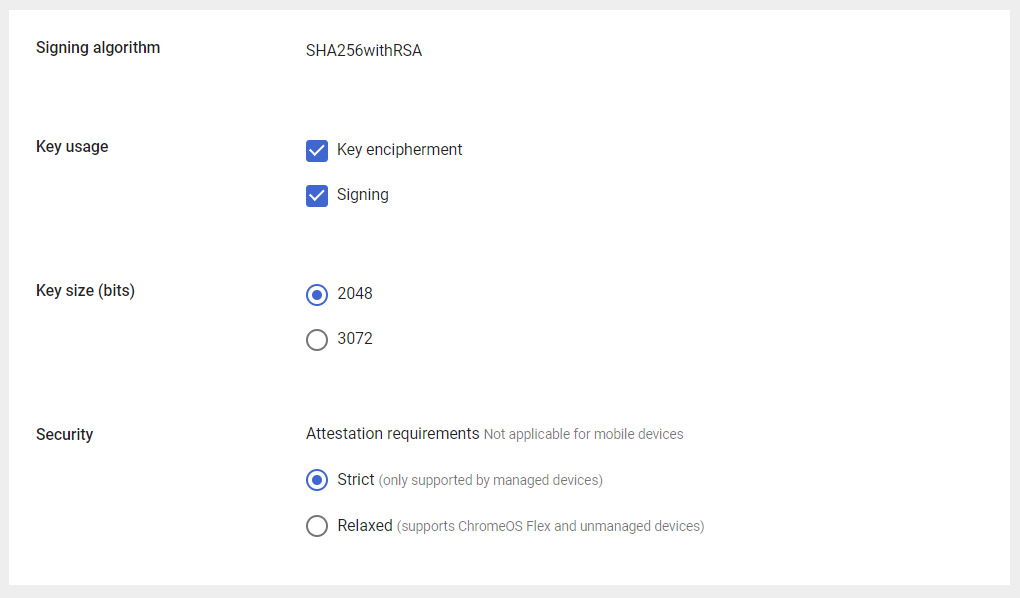
| Attribute             | Value                                      |
| --------------------- | ------------------------------------------ |
| **Signing algorithm** | SHA256withRSA                              |
| **Key usage**         | Key encipherment, Signing                  |
| **Key size (bits)**   | 3072                                       |
| **Security**          | Strict (only supported by managed devices) |

<figure><img src="https://2535731700-files.gitbook.io/~/files/v0/b/gitbook-x-prod.appspot.com/o/spaces%2F-LoGejQeUQcw7lqnQ3WX%2Fuploads%2FSIjM9XKUUryt7mrwAeXD%2Fimage.png?alt=media&amp;token=675f1557-305f-4d06-8038-0ff755c1b456" alt=""><figcaption></figcaption></figure>

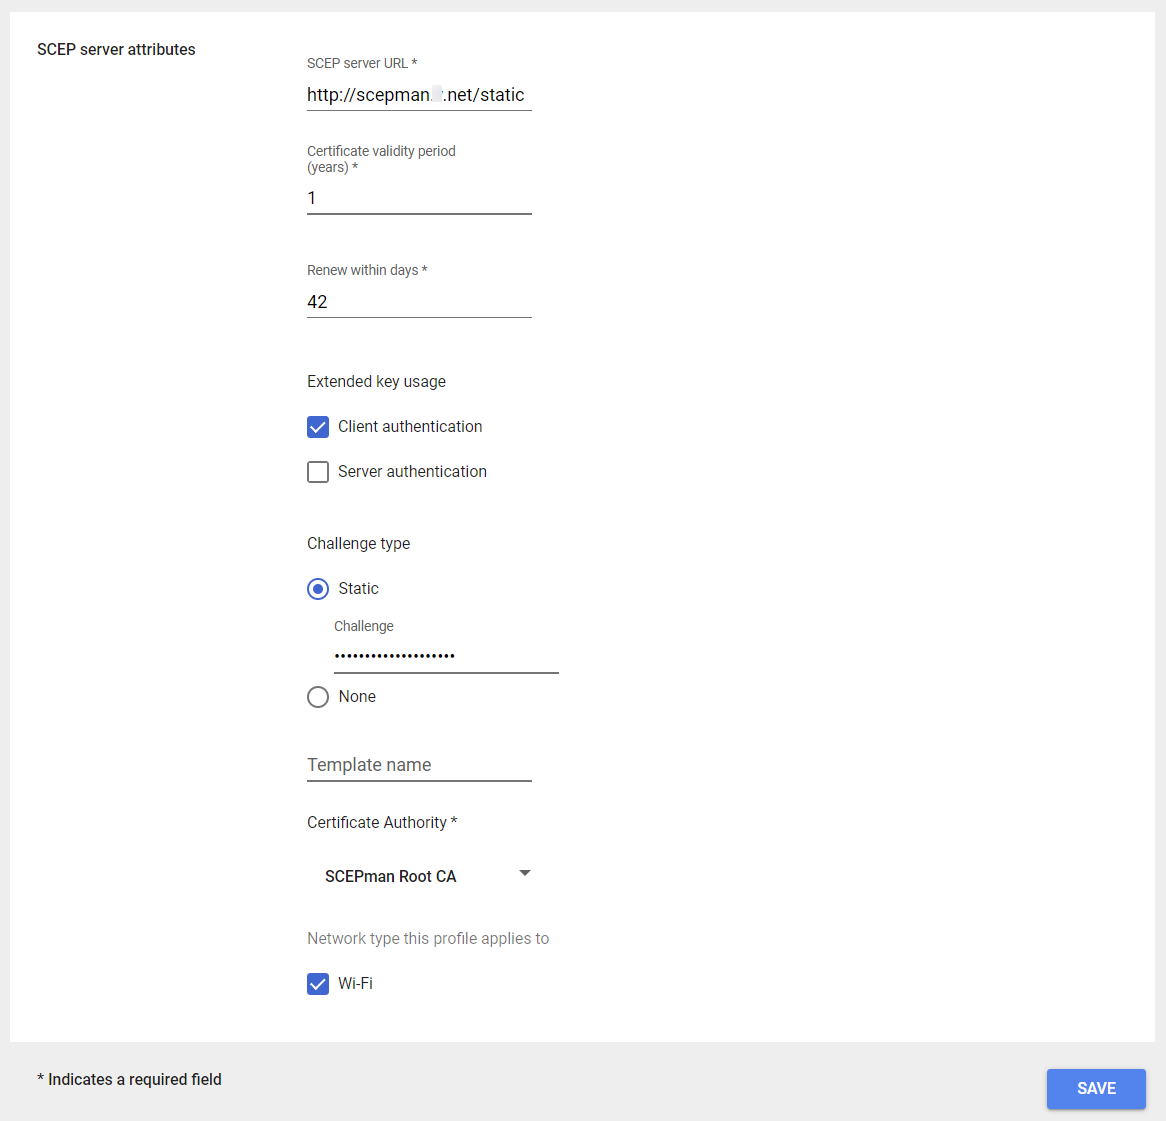
<table><thead><tr><th width="246">Attribute</th><th>Value</th></tr></thead><tbody><tr><td><strong>SCEP server attributes</strong></td><td><strong>SCEP server URL</strong>: <a href="http://scepman.yourdomain.net/static">http://scepman.yourdomain.net/static</a></td></tr><tr><td></td><td><strong>Certificate validity period (years)</strong>: 1</td></tr><tr><td></td><td><strong>Renew within days</strong>: 42</td></tr><tr><td></td><td><strong>Extended key usage</strong>: Client authentication</td></tr><tr><td></td><td><strong>Challenge type</strong>: Static</td></tr><tr><td></td><td><strong>Challenge</strong>: Provide the challenge value you have configured when <a href="/certificate-management/static-certificates/google-workspace.md#enable-google-workspace-integration">enabling the SCEPman Google Workspace</a> integration.</td></tr><tr><td></td><td><strong>Certificate Authority</strong>: Reference here the certificate profile containing your <a href="#root-certificate">SCEPman Root CA</a>.</td></tr><tr><td></td><td><strong>Network type this profile applies to</strong>: Wi-Fi</td></tr></tbody></table>

<figure><img src="https://2535731700-files.gitbook.io/~/files/v0/b/gitbook-x-prod.appspot.com/o/spaces%2F-LoGejQeUQcw7lqnQ3WX%2Fuploads%2Ff6mJecEjRIAwOWRrgqPn%2Fimage.png?alt=media&amp;token=13c91876-7083-41a1-b453-b64a1296614d" alt=""><figcaption></figcaption></figure>

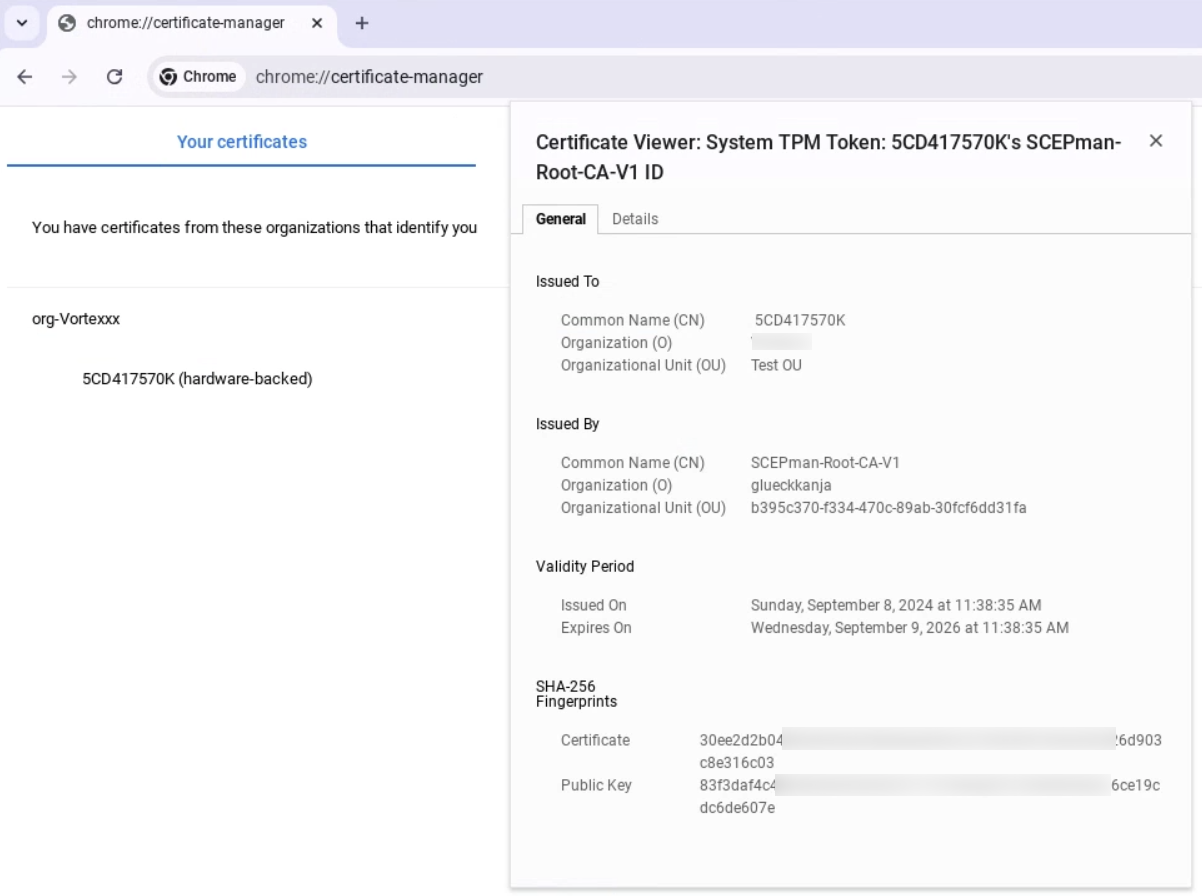
5. The SCEP profile is automatically distributed to users in the organizational unit.
6. To check for this certificate, in your Chromebook navigate to **chrome://certificate.manager** > **Your certificates.**

<figure><img src="https://2535731700-files.gitbook.io/~/files/v0/b/gitbook-x-prod.appspot.com/o/spaces%2F-LoGejQeUQcw7lqnQ3WX%2Fuploads%2FHZwz3tMJAesfSMhsC6OG%2Fimage.png?alt=media&amp;token=ef302613-6949-4e85-b889-6dfbadbfa57d" alt=""><figcaption></figcaption></figure>


---

# Agent Instructions
This documentation is published with GitBook. GitBook is the documentation platform designed so that both humans and AI agents can read, navigate, and reason over technical content effectively. Learn more at gitbook.com.

## Querying This Documentation
If you need additional information that is not directly available in this page, you can query the documentation by asking a question.

Perform an HTTP GET request on the following URL with the `ask` and `goal` query parameters:

```
GET https://docs.scepman.com/certificate-management/static-certificates/google-workspace/chromeos.md?ask=<question>&goal=<user_goal>
```

`ask` is the immediate question: it should be specific, self-contained, and written in natural language.
`goal` is what the user is ultimately trying to achieve, the reason they need the answer. Sharing it helps GitBook give you a better, more relevant answer. A goal is most helpful when it describes the outcome the user wants rather than restating the question. For example, with `ask=how do I create an API token`, a goal like `automate deployments from our CI pipeline` lets GitBook tailor the answer to that use case.

The response will contain a direct answer to the question and relevant excerpts and sources from the documentation.

Use this mechanism when the answer is not explicitly present in the current page, you need clarification or additional context, or you want to retrieve related documentation sections.