# 分割 Tenant

{% hint style="warning" %}
SCEPman Enterprise Edition のみ
{% endhint %}

## 概要 <a href="#overview" id="overview"></a>

SCEPman は、証明書をユーザーおよび/またはデバイスに発行する Azure/Intune テナントとは別の Azure テナントから動作するようにセットアップできます。この構成は split-tenancy として知られており、特に **MSP にとって便利です** 。これにより、各顧客ごとに専用のバックエンドと固有の CA を維持しながら、顧客全体で Azure インフラストラクチャのコストを集約できます。

Split-tenancy には **大きな欠点が伴います**: [Managed Identities](/ja/scepman-depuroi/permissions/post-installation-config.md) 。Graph API（Azure AD および Intune）に対する認証は、App registration と Client secret を使用して処理されるため、もはや使用できません。これらは期限切れになるため、（MSP により）管理する必要があります。

以下では、ホスティング テナントを **home tenant,** と呼び、顧客テナントを **target tenant**と呼びます。SCEPman のリソースは **home tenant**に存在し、管理対象デバイスは **target tenant** に存在します。下の図のとおりです:

<figure><img src="/files/c5873b240409f24e64ec6defc2b5e9b3f4265b55" alt=""><figcaption></figcaption></figure>

## 構成手順

1. 次の **home tenant**、当社の [Getting Started Guide](/ja/scepman-depuroi/deployment-guides.md).

### に記載されているとおり、SCEPman/Certificate Master の標準デプロイを実行します。

2. SCEPman の **App service** に移動し、次に「Settings」-->「Environment variables」に進みます。以下のパラメーターを見つけて、 **削除** します:

| Environment Variables                                           |
| --------------------------------------------------------------- |
| `AppConfig:AuthConfig:ManagedIdentityEnabledForWebsiteHostname` |
| `AppConfig:AuthConfig:ManagedIdentityEnabledOnUnixTime`         |
| `AppConfig:AuthConfig:ManagedIdentityPermissionLevel`           |

3. **以下の設定の名前を変更します（** 値は変更しないでくださ&#x3044;**）。**):

<table><thead><tr><th width="384">元の名前</th><th>新しい名前</th></tr></thead><tbody><tr><td><code>AppConfig:AuthConfig:ApplicationId</code></td><td><code>AppConfig:AuthConfig:HomeApplicationId</code></td></tr><tr><td><code>AppConfig:AuthConfig:TenantId</code></td><td><code>AppConfig:AuthConfig:HomeTenantId</code></td></tr></tbody></table>

4. 以下の手順に従って **App registration** を **target tenant** を作成します: [Azure App Registration](/ja/scepman-depuroi/permissions/azure-app-registration.md)。これにより、SCEPman は **App registration** で Azure AD と Intune のディレクトリにアクセスできるようになります。 **target tenant**.

{% hint style="warning" %}
この **client secret** この **App registration** には有効期限があり、期限切れになる前に更新する必要があります。更新のリマインダーを設定してください。
{% endhint %}

**作成** アプリ登録の作成時にまだ行っていない場合は、以下の新しい環境変数を設定します:

<table><thead><tr><th width="395">名前</th><th>値</th></tr></thead><tbody><tr><td><code>AppConfig:AuthConfig:ApplicationId</code></td><td>GUID of the <strong>App registration</strong> that was created before <strong>（target tenant）。</strong></td></tr><tr><td><code>AppConfig:AuthConfig:TenantId</code></td><td>Tenant ID of the <strong>target tenant</strong>.</td></tr><tr><td><code>AppConfig:AuthConfig:ApplicationKey</code></td><td><strong>値</strong> を <strong>Client secret</strong> that was created as part of the <strong>App registration</strong> を <strong>target tenant</strong>.</td></tr></tbody></table>

5. 変更を適用します。
6. SCEPman を再起動します **App service**.

### Certificate Master

7. Certificate Master に移動し、次に「Settings」>「Environment variables」に進みます。 **App service** これで 2 つの विकल्पがあります:
8. ユーザーに
   1. から Certificate Master にログインして証明書を発行してほしい場合、これにはホーム テナント内のゲスト ユーザーも含まれます。たとえば target tenant からのユーザーです。 **home tenant** オプション 1: Home Tenant のユーザーが Certificate Master にログイン&#x20;

<figure><img src="/files/0967feeb82441c82e9c19be32fc322da13e93a9b" alt=""><figcaption><p>その場合は、</p></figcaption></figure>

名前を変更 **してください。** 値は変更しないでくださ&#x3044;**）。**):

<table><thead><tr><th width="385">元の名前</th><th>新しい名前</th></tr></thead><tbody><tr><td><code>AppConfig:AuthConfig:TenantId</code></td><td><code>AppConfig:AuthConfig:HomeTenantId</code></td></tr><tr><td><code>AppConfig:AuthConfig:ApplicationId</code></td><td><code>AppConfig:AuthConfig:HomeApplicationId</code></td></tr></tbody></table>

b. ユーザーに **target tenant** から Certificate Master にログインして証明書を発行してほしい場合、これにはターゲット テナント内のゲスト ユーザーも含まれます。たとえば home tenant からのユーザーです。&#x20;

<figure><img src="/files/ca452707f0de07536f6f11310489b4a4b2902a76" alt=""><figcaption><p>オプション 2: Target Tenant のユーザーが Certificate Master にログイン</p></figcaption></figure>

その場合は、以下を実行します:

* 開いて **PowerShell** または **Azure Cloud Shell** で **target tenant** 次のコマンドを実行します:

```
Install-Module SCEPman -Scope CurrentUser -Force
Register-SCEPmanCertMaster -CertMasterBaseURL <url>
```

置き換える `<url>` を Certificate Master の URL に置き換えます

* この **CMDlet** は **Application Id** と **Tenant Id** （ **target tenant**のもの）を出力します。これら 2 つの値を Certificate Master の設定に&#x20;
  * `AppConfig:AuthConfig:HomeApplicationId` および
  * `AppConfig:AuthConfig:HomeTenantId` として入力します。
* 次に **作成し** 以下の新しいアプリケーション設定を、SCEPman と同じ値で、既存の設定を上書きする可能性も含めて作成します:

<table><thead><tr><th width="393">名前</th><th>値</th></tr></thead><tbody><tr><td><code>AppConfig:AuthConfig:ApplicationId</code></td><td>GUID of the <strong>App registration</strong> 以前に作成されたもの。</td></tr><tr><td><code>AppConfig:AuthConfig:TenantId</code></td><td>Tenant ID of the <strong>target tenant</strong>.</td></tr><tr><td><code>AppConfig:AuthConfig:ApplicationKey</code></td><td><strong>値</strong> を <strong>Client secret</strong> that was created as part of the <strong>App registration</strong> 以前。<br>必要であれば、Certificate Master 用に別の新しい Client secret を作成できます。</td></tr></tbody></table>

9. 変更を保存します
10. SCEPman Certificate Master を再起動します **App service**.
11. を通じて証明書を要求する権限を付与します **Certificate Master** Web アプリについては、 [こちら](/ja/scepman-depuroi/permissions/post-installation-config.md#granting-the-rights-to-request-certificates-via-the-certificate-master-website)

概要として、以下は **Certificate Master** で使用されるアカウントと、その用途です:

| アカウント                        | 何に使用されますか?                                                                                                 | 備考                                                             |
| ---------------------------- | ---------------------------------------------------------------------------------------------------------- | -------------------------------------------------------------- |
| Managed Identity             | <ul><li>SCEPman に送信された CSR を承認する</li><li>Storage Account へのアクセス</li></ul>                                  | N/A                                                            |
| App ID が `ApplicationId`     | Certificate Master はこのコンテキストで Microsoft Graph にアクセスし、Intune 経由でどの証明書が登録されたかを確認します                          | もし `ApplicationKey` が存在しない場合は、代わりに Managed Identity が使用されます。   |
| App ID が `HomeApplicationId` | ユーザーは認証します **から** このアプリケーションに。Certificate Master にアクセスするユーザーが存在するテナントにある必要があります（ただし、他のテナントのゲストユーザーも承認できます） | もし `HomeApplicationId` が存在しない場合は、 `ApplicationId` が代わりに使用されます。 |

これで Split-Tenancy の構成は完了です。続いて、MDM に基づいて SCEP プロファイルを構成できます。詳細は [こちら](https://docs.scepman.com/advanced-configuration/split-tenancy#:~:text=CERTIFICATE%20DEPLOYMENT)

## 複数の target tenant がある場合の考慮事項

異なる target tenant に証明書を発行する複数の SCEPman インスタンスを持ちたい場合、それらを相互に分離するために追加の構成手順を実行する必要があります。

考えられる構成としては、すべての SCEPman App Service にコンピューティング リソースを提供する単一の App Service Plan を保持する管理用リソース グループを含めることができます。複数のテナントに対してこれを行う場合は、次の点を考慮してください:

* 各インスタンスには、それらを区別するための独自のリソース グループを持たせるべきです
* 権限を分離するために、各インスタンスごとに App Registrations を作成する必要があります
* App Service Plan は複数のインスタンスにサービスを提供するため、独立した管理用リソース グループに作成する必要があります

この図では、管理用テナントとその 2 つの SCEPman インスタンスが、Contoso と Tailwind のテナントに証明書を提供しています:

{% @mermaid/diagram content="graph LR
subgraph t0\[Management Tenant]
subgraph rg0\[rg-scepman-mgmt]
asp\[asp-scepman-mgmt]
end

subgraph rg1\[rg-scepman-contoso]
app1\[app-scepman-contoso]
appreg1\[scepman-api-contoso]
end

subgraph rg2\[rg-scepman-tailwind]
app2\[app-scepman-tailwind]
appreg2\[scepman-api-tailwind]
end
end

subgraph t1\[Contoso Tenant]
i1\[Intune]
e1\[Entra ID]
end

subgraph t2\[Tailwind Tenant]
i2\[Intune]
e2\[Entra ID]
end

classDef rg stroke:#6dc3d1, fill:#d5ecf2
classDef asp stroke:#2962FF, fill:#e0e7ff
classDef app stroke:#fcd116, fill:#FFF8D8
classDef appreg stroke:#6DD185, fill:#ddffd8
classDef tenant stroke:#4d93c0, fill:#d0e2f0
classDef entra color:#ffffff, stroke:#0b58a4, fill:#0078d6
classDef intune stroke:#2ebddd, fill:#d9f4fa

class rg0,rg1,rg2 rg
class asp asp
class app1,app2 app
class appreg1,appreg2 appreg
class t0,t1,t2 tenant
class e1,e2 entra
class i1,i2 intune

asp --serves--> app1
asp --serves--> app2

app1 --> appreg1
appreg1 -- reads data--> i1
appreg1 -- reads data--> e1
i1 --requests certificates--> app1

app2 --> appreg2
appreg2 --reads data--> i2
appreg2 --reads data--> e2
i2 --requests certificates--> app2" fullWidth="true" %}

### 既存の App Service Plan に新しい SCEPman インスタンスを追加する

次の [enterprise deployment method](https://docs.scepman.com/scepman-deployment/deployment-options/enterprise-deployment) を使用して新しい SCEPman インスタンスをデプロイする際、既存の App Service Plan の resource id を入力して、このインスタンスをそこに追加することができます。

<figure><img src="/files/d94b216963433329948ac33c0db3e5e423b4ed85" alt=""><figcaption></figcaption></figure>

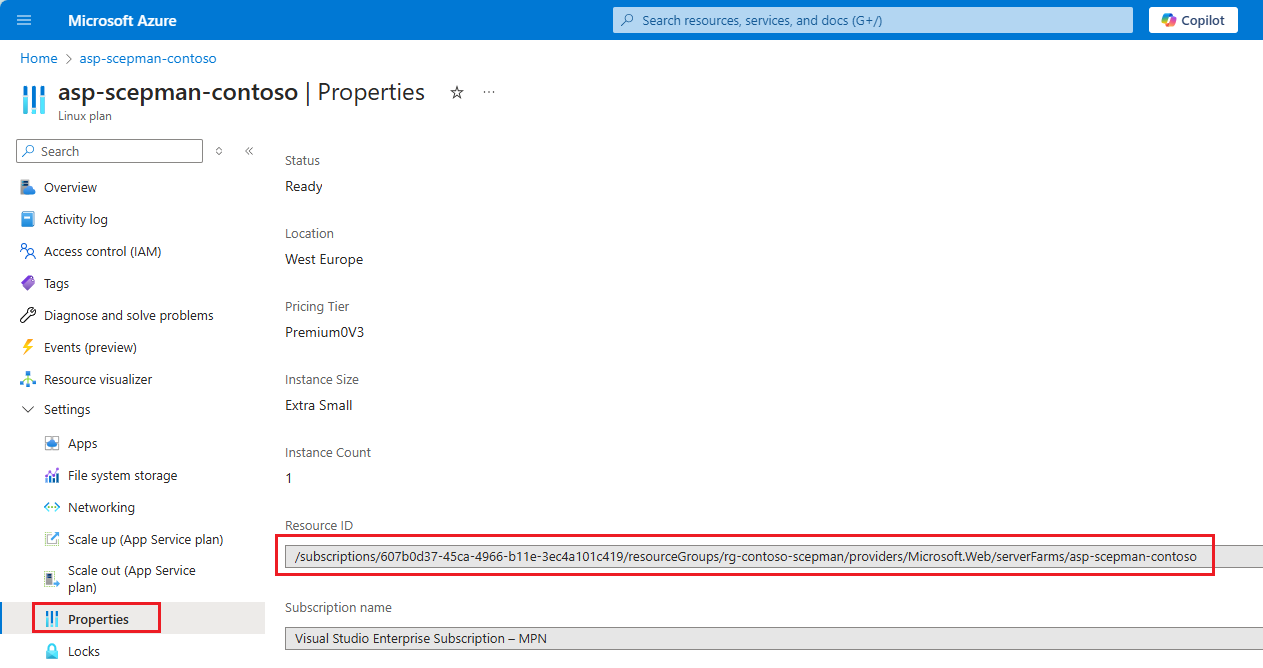
この resource id は、既存の app service plan のプロパティで確認できます:

<figure><img src="/files/7f3caec1f33a837002e7498ccd24bb8031b4200f" alt=""><figcaption></figcaption></figure>

### 顧客ごとの App registrations を作成する

アプリの権限を分離するには、デプロイ後コマンドを調整してカスタム App Registrations を指定する必要があります:

{% code overflow="wrap" %}

```powershell
Complete-SCEPmanInstallation -SCEPmanAppServiceName "app-scepman-contoso" -AzureADAppNameForSCEPman "scepman-api-contoso" -AzureADAppNameForCertMaster "certmaster-contoso" -SearchAllSubscriptions 6>&1
```

{% endcode %}

このコマンドにより、以前のインスタンスから分離された完全に構成済みの SCEPman インスタンスが作成されます。これで、このインスタンスの split tenancy の構成に進むことができます。

Certificate Master に関する上記のセクションは、このサービスを顧客テナントからアクセス可能にしたい場合に、任意で適用できます。


---

# Agent Instructions: Querying This Documentation

If you need additional information that is not directly available in this page, you can query the documentation dynamically by asking a question.

Perform an HTTP GET request on the current page URL with the `ask` query parameter:

```
GET https://docs.scepman.com/ja/azure-gou-cheng/split-tenancy.md?ask=<question>
```

The question should be specific, self-contained, and written in natural language.
The response will contain a direct answer to the question and relevant excerpts and sources from the documentation.

Use this mechanism when the answer is not explicitly present in the current page, you need clarification or additional context, or you want to retrieve related documentation sections.