> For the complete documentation index, see [llms.txt](https://docs.scepman.com/llms.txt). Markdown versions of documentation pages are available by appending `.md` to page URLs; this page is available as [Markdown](https://docs.scepman.com/ja/azure-gou-cheng/private-endpoints.md).

# プライベート エンドポイント

SCEPman 2.8 以降をインストールすると、Storage Account と Key Vault は Private Endpoint を介して VNET に接続されます。例外を定義しない限り、これら 2 つの Azure リソースのデータへのアクセスはこの VNET 経由でのみ可能です。

この VNET は、他の SCEPman コンポーネントと同じリソース グループにあります。SCEPman と SCEPman Certificate Master の App Service は VNET に接続されており、ネットワーク レベルで Storage Account と Key Vault にアクセスできます。

インストール後は例外が構成されていないため、他のエンティティは Key Vault の証明書やキー、または Storage Account の Table Storage にアクセスできません。必要に応じて、たとえば [下位 CA を生成する場合](/ja/scepman-nodepuroi/intermediate-certificate.md) または[ Storage Account を照会する場合](/ja/sono/faqs/general.md#how-can-i-programmatically-query-the-storage-account-table)、該当する Azure リソースの Networking ブレードで例外を追加する必要があります。

Key Vault と Storage Account の管理インターフェースへのアクセスは影響を受けません。つまり、Storage Account の SKU を変更したり Key Vault のアクセス ログを確認したりするために、管理用マシンを例外リストに追加する必要はありません。

SCEPman 2.8 以降をインストールしても、SCEPman と SCEPman Certificate Master の App Service には Private Endpoint はありません。ネットワーク制限なしで、インターネットから引き続きアクセスできます。SCEPman は通常、ネットワーク接続を確立するために使用されるインフラストラクチャの一部であり、そのためまだ接続していない場合でも利用可能であるべきなので、ネットワーク レベルで SCEPman へのアクセスを制限しないことを推奨します。

必要であれば、Conditional Access を使用して、ネットワーク条件を含むさまざまな制限で SCEPman Certificate Master へのアクセスを制限できます。SCEP と OCSP の 2 つのエンドポイントは Entra 認証を使用しないため、SCEPman では通常 Conditional Access は使用しません。ただし、アクセスを制限するために Conditional Access を使用することがあります [SCEPman の REST API](/ja/zheng-ming-shu-guan-li/api-certificates.md).

## Private Endpoint に使用される Azure リソース

<table><thead><tr><th width="374">種類</th><th>説明</th></tr></thead><tbody><tr><td>仮想ネットワーク</td><td>SCEPman App Services、Key Vault、および Storage Account は、この VNET を介して接続します。</td></tr><tr><td>プライベート エンドポイント (×2)</td><td>Key Vault 用が 1 つ、Storage Account 用が 1 つです。これにより、VNET 経由でアクセスできるようになります。</td></tr><tr><td>プライベート DNS ゾーン (×2)</td><td>Key Vault 用が 1 つ、Storage Account 用が 1 つです。どちらも VNET 内に内部 IP アドレスを持ち、それぞれのプライベート DNS ゾーンに名前があります。</td></tr><tr><td>ネットワーク インターフェイス (×2)</td><td>Key Vault 用が 1 つ、Storage Account 用が 1 つです。プライベート エンドポイントを VNET に接続します。</td></tr></tbody></table>

## 既存の SCEPman インストールへの Private Endpoint の追加

SCEPman 2.7 以前をインストールしている場合、SCEPman 2.8 以降に更新しても、Key Vault と Storage Account に Private Endpoint は自動的に追加されません。明示的に判断したうえで、手動で追加する必要があります。以下のガイドに従ってください。

{% stepper %}
{% step %}

### 仮想ネットワークの作成

* SCEPman のリソース グループで、既定の設定または組織で必要とされる設定を使用して新しい仮想ネットワークを作成します。これには **既定のサブネット**.
* 新しい仮想ネットワークに追加のサブネットを作成します **仮想ネットワーク** 既定の設定で、次を設定します **「サブネットの委任」** を **Microsoft.Web/serverFarms**

<figure><img src="https://114237723-files.gitbook.io/~/files/v0/b/gitbook-x-prod.appspot.com/o/spaces%2F-LoGejQeUQcw7lqnQ3WX%2Fuploads%2Fiam78Sg5DERiTw9hODKt%2Fimage.png?alt=media&amp;token=81586f35-8b3d-4048-9b55-0f879c1e779d" alt=""><figcaption></figcaption></figure>
{% endstep %}

{% step %}

### Key Vault の Private Endpoint を作成する

1. SCEPman のリソース グループ > に移動し、 **KeyVault** > 設定 > ネットワーキング > Private endpoint connections に移動し、Private Endpoint を作成します
2. リソースの種類を選択します: **Microsoft.KeyVault/vaults**
3. 次を選択します **KeyVault** リソースおよび **ボールト** ターゲットのサブリソースとして
4. 仮想ネットワークと既定のサブネットを選択します（最初の手順で作成したサブネットではありません）
5. 有効にする **プライベート DNS ゾーンと統合する** Private DNS ゾーンを自動的に作成して接続するために
   {% endstep %}

{% step %}

### Storage Account の Private Endpoint を作成する

1. SCEPman のリソース グループ > に移動し、 **Storage Account** > セキュリティ + ネットワーキング > ネットワーキング > Private endpoints に移動し、Private Endpoint を作成します
2. リソースごとに、ターゲットのサブリソースを次に設定します **テーブル**
3. 仮想ネットワークと既定のサブネットを選択します
4. 有効にする **プライベート DNS ゾーンと統合する** Private DNS ゾーンを自動的に作成して接続するために
   {% endstep %}

{% step %}

### SCEPman App Service を統合する

1. へ移動する **SCEPman App Service** > ネットワーキング > で仮想ネットワーク統合を追加します **送信トラフィックの構成** 「未構成」をクリックして
2. 仮想ネットワークと、最初の手順で作成したサブネットを選択します。
3. 「送信インターネット トラフィック」のチェックを外し、適用します

<figure><img src="https://114237723-files.gitbook.io/~/files/v0/b/gitbook-x-prod.appspot.com/o/spaces%2F-LoGejQeUQcw7lqnQ3WX%2Fuploads%2FNkehFzE9EYgmw0Mbdp17%2Fimage.png?alt=media&amp;token=0ca8d951-9753-455e-8e18-96708acc71d1" alt=""><figcaption></figcaption></figure>

<figure><img src="https://114237723-files.gitbook.io/~/files/v0/b/gitbook-x-prod.appspot.com/o/spaces%2F-LoGejQeUQcw7lqnQ3WX%2Fuploads%2F2DmA1nHSDuoiftY3NYbS%2Fimage.png?alt=media&amp;token=0b20e929-bb07-413c-871f-21e3ca07fe89" alt=""><figcaption></figcaption></figure>
{% endstep %}

{% step %}

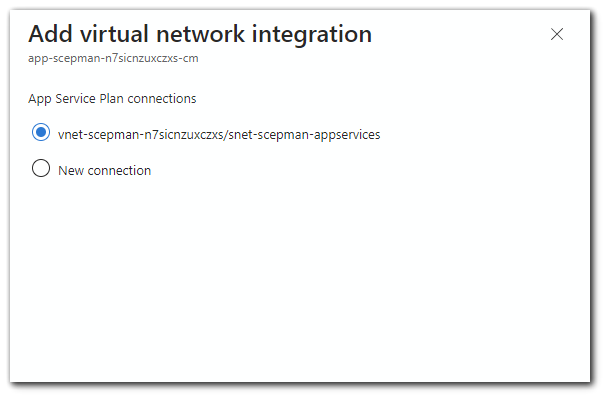
### Certificate Master の App Service を統合する

* 2 つ目の App Service に仮想ネットワーク統合を追加すると、一覧から前の接続を選択できるため、新しい接続を作成する必要はありません。
* 有効な場合は、「送信インターネット トラフィック」のチェックを外し、適用します

<figure><img src="https://114237723-files.gitbook.io/~/files/v0/b/gitbook-x-prod.appspot.com/o/spaces%2F-LoGejQeUQcw7lqnQ3WX%2Fuploads%2Fl4sw69lqaJcaO4xFwbrR%2Fimage.png?alt=media&amp;token=a9eab453-ab6f-4b81-850e-da51e2135215" alt=""><figcaption></figcaption></figure>
{% endstep %}

{% step %}

### Private Endpoint の承認を確認する

Key Vault と Storage Account の両方の Private Endpoint が承認済み状態であることを確認します

<figure><img src="https://114237723-files.gitbook.io/~/files/v0/b/gitbook-x-prod.appspot.com/o/spaces%2F-LoGejQeUQcw7lqnQ3WX%2Fuploads%2FitjKr906PCf63W5HQExi%2Fimage.png?alt=media&amp;token=e2338b6c-b786-496a-8d3f-b40418140a5a" alt=""><figcaption></figcaption></figure>
{% endstep %}

{% step %}

### テストと結果

確認できたら、Key Vault と Storage Account の両方のパブリック アクセスを無効にできます。

<figure><img src="https://114237723-files.gitbook.io/~/files/v0/b/gitbook-x-prod.appspot.com/o/spaces%2F-LoGejQeUQcw7lqnQ3WX%2Fuploads%2FxfV14MPyx6K2z5VQewLH%2Fimage.png?alt=media&amp;token=6279a827-2dde-47cf-9e33-f17c4e3a3dc7" alt=""><figcaption></figcaption></figure>

正しく接続されていれば、SCEPman のホームページには、すべての接続が「Connected」と表示されるはずです\
![](https://114237723-files.gitbook.io/~/files/v0/b/gitbook-x-prod.appspot.com/o/spaces%2F-LoGejQeUQcw7lqnQ3WX%2Fuploads%2FM904qQ3M8fi90AXhUXRC%2Fimage.png?alt=media\&token=ec13dc88-8e08-41c1-91ef-6e8f495d81f0)

MDM または [Certificate Master。](/ja/zheng-ming-shu-guan-li/certificate-master.md)
{% endstep %}
{% endstepper %}


---

# Agent Instructions
This documentation is published with GitBook. GitBook is the documentation platform designed so that both humans and AI agents can read, navigate, and reason over technical content effectively. Learn more at gitbook.com.

## Querying This Documentation
If you need additional information that is not directly available in this page, you can query the documentation dynamically by asking a question.

Perform an HTTP GET request on the current page URL with the `ask` query parameter, and the optional `goal` query parameter:

```
GET https://docs.scepman.com/ja/azure-gou-cheng/private-endpoints.md?ask=<question>&goal=<endgoal>
```

`ask` is the immediate question: it should be specific, self-contained, and written in natural language.
`goal` is optional and describes the broader end goal you are ultimately trying to accomplish on behalf of the user. GitBook uses it to tailor the answer towards what is most useful for that goal.

The response will contain a direct answer to the question and relevant excerpts and sources from the documentation.

Use this mechanism when the answer is not explicitly present in the current page, you need clarification or additional context, or you want to retrieve related documentation sections.