> For the complete documentation index, see [llms.txt](https://docs.scepman.com/llms.txt). Markdown versions of documentation pages are available by appending `.md` to page URLs; this page is available as [Markdown](https://docs.scepman.com/ja/scepman-nodepuroi/intermediate-certificate.md).
# 中間 CA
{% hint style="warning" %}
SCEPman Enterprise Edition のみ
{% endhint %}
別の Root CA をプライマリ認証局として使用したい場合は、中間 CA 証明書を作成して、SCEPman を下位認証局として運用できます。正しい証明書を Azure Key Vault で直接作成し、Root CA で署名するための CSR をダウンロードできます。署名済みの要求は Azure Key Vault にアップロードしてマージできます。この記事では、必要な手順を詳しく説明します。
## Key Vault のアクセス許可
CSR の作成と中間 CA 証明書のマージを行うには、ユーザー アカウントに Azure Key Vault へのアクセス権を付与する必要があります。アクセス許可の割り当て方法は、Key Vault のアクセス構成によって異なります:
{% tabs %}
{% tab title="Azure RBAC" %}
1. Azure Portal で Azure Key Vault に移動します
2. 次をクリックします **アクセス制御 (IAM)** 左側のナビゲーション ペインの
3. 次をクリックします **ロールの割り当て** を開き、新しいロールの割り当てを追加します
Key Vault に新しいロールの割り当てを追加する
4. 次の **Key Vault Certificate Officer** ロールを選択し、 **次へ**
5. 次に、AAD 管理者アカウントを **メンバー** セクションで検索して追加し、ロールの割り当てを続行します
ロールの割り当てを追加すると、Azure AD アカウントは CSR の作成と証明書のアップロードを許可されます。
{% endtab %}
{% tab title="Vault アクセス ポリシー" %}
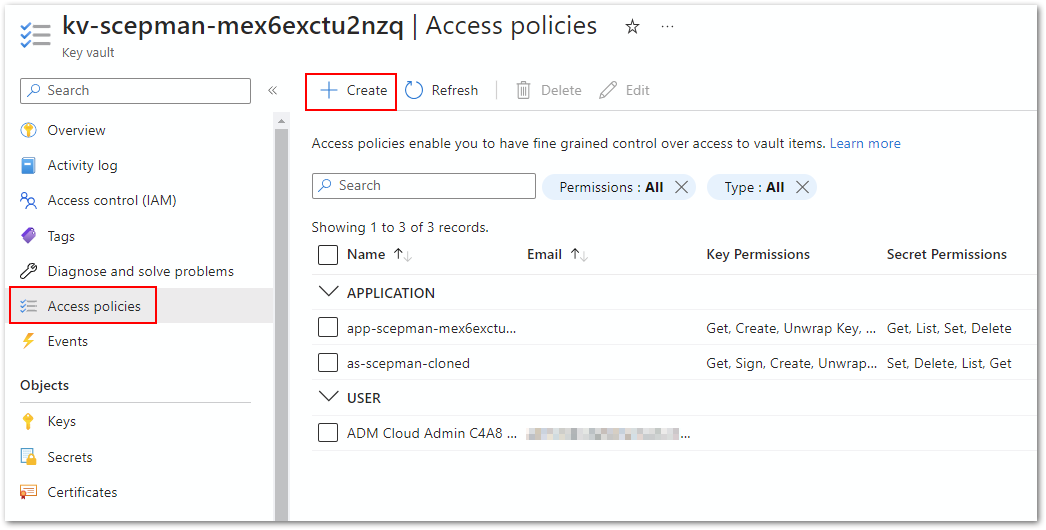
1. Azure Portal で Azure Key Vault に移動します
2. 次をクリックします **アクセス ポリシー** 左側のナビゲーション ペインの
3. 次をクリックします **作成** を選択し、 **証明書管理** テンプレートを選んでから次へ
4. 次に、AAD 管理者アカウントを **プリンシパル** セクションで、次へ、次へ、の順に進み、作成します
アクセス許可を追加すると、Azure AD アカウントは CSR の作成と証明書のアップロードを許可されます。
{% endtab %}
{% endtabs %}
## 管理システムに対して Key Vault のネットワーク設定を開放する
を使用している場合、 [Private Endpoint](/ja/azure-gou-cheng/private-endpoints.md) Key Vault では、クライアントがネットワーク レベルで Key Vault にアクセスできるようにする例外を追加する必要があります。Private Endpoint を使用していない場合は、この部分をスキップできます。
* Azure Portal で Azure Key Vault に移動します。
* [設定]の下にある Networking ブレードに移動します。
* 現在「Disable public access」が選択されている場合は、「Allow public access from specific virtual networks and IP addresses」に切り替えます。
* 後で [SCEPman PowerShell モジュールを実行するクライアントの IP アドレスを追加します](#creating-intermediate-ca-certificate-with-the-scepman-powershell-module)。Azure Cloud Shell を使用していて、 [それが VNET に接続されている場合は、](https://learn.microsoft.com/en-us/azure/cloud-shell/vnet/overview)この VNET を追加できます。それ以外の場合、最も簡単な方法は Cloud Shell の Public IP アドレスを一時的に許可することです。Key Vault は強力な認証によって保護されているためです。たとえば、次のようなコマンドを使用できます `(Invoke-WebRequest -UseBasicParsing -uri "http://ifconfig.me/ip").Content` セッションの Public IP アドレスを取得するには。
## Azure App Service 設定を更新する
次の手順は、次の手順で作成する中間 CA のサブジェクト名に合わせて Azure App Service の構成を更新することです。
1. Azure App Service に移動します
2. 次をクリックします **環境変数** 左側のナビゲーション ペインで
3. で **アプリケーション設定、** 次の設定を編集する必要があります:
1. `AppConfig:KeyVaultConfig:RootCertificateConfig:CertificateName`\
これを、中間 CA の優先する共通名 (CN) に変更します。
2. `AppConfig:KeyVaultConfig:RootCertificateConfig:Subject`\
サブジェクト名の CN 値のみを、上で使用した共通名に合わせて変更してください。
4. 次をクリックします **適用して確認します。**
5. Azure を再起動し **App Service** て変更を適用したら、SCEPman の URL に移動します。
{% hint style="warning" %}
CertificateName 変数は、Azure Key Vault に作成される証明書オブジェクトに直接対応することに注意してください。そのため、使用できるのは英数字とダッシュを含む証明書名だけです
{% endhint %}
## SCEPman PowerShell モジュールを使用して中間 CA 証明書を作成する
{% hint style="warning" %}
このモジュールを正しく機能させるには、 [Azure CLI](https://docs.microsoft.com/en-us/cli/azure/install-azure-cli) (別名 `az`がインストールされたワークステーションが必要です。Azure CLI は [Azure Cloud Shell](https://docs.microsoft.com/en-us/azure/cloud-shell/overview)にあらかじめインストールされており、これがこのモジュールの実行に推奨される環境です。
{% endhint %}
SCEPman PowerShell モジュールのバージョン 1.9 以降を使用して、中間 CA 証明書用の CSR を作成できます。次のコマンドで、PowerShell Gallery からモジュールの最新バージョンをインストールできます:
```powershell
Install-Module -Name SCEPman -Scope CurrentUser -Force
```
次に、証明書に表示される組織名をモジュールに指定できます:
```powershell
Reset-IntermediateCaPolicy -Organization "My Organization"
```
中間 CA のサブジェクトを、上で使用したものに一致するように構成します `AppConfig:KeyVaultConfig:RootCertificateConfig:Subject` (必要に応じて、CSR の内容を制御するために追加の設定をいくつか変更できます):
{% code lineNumbers="true" %}
```
$policy = Get-IntermediateCaPolicy
$policy.policy.x509_props.subject = "CN=YOUR_CN_FROM_ABOVE,OU=YOUR_TENANT_ID,O=YOUR_ORGANIZATION"
# $policy の追加設定をいくつか変更
Set-IntermediateCaPolicy -Policy $policy
```
{% endcode %}
最後に、次のコマンド(または環境に応じた同等のコマンド)で CSR を作成できます:
```powershell
New-IntermediateCA -SCEPmanAppServiceName "app-scepman-example" -SearchAllSubscriptions 6>&1
```
このコマンドは、署名のために Root CA に送信する CSR を出力します。
## 中間 CA 証明書を発行する
次に、CSR を Root CA に送信して、発行された中間 CA 証明書を取得します。証明書をディスク (.cer) に保存しておくと、次の手順で Azure Key Vault の秘密キーと一緒にアップロードしてマージできます。
### ADCS Enterprise Root CA の特別な手順
Active Directory Certificate Services を AD 連携 Root CA として使用しており、Certificate Template を選択する必要がある場合は、次の Key Usages を含める必要があります: "CRLSign"、"DigitalSignature"、"KeyEncipherment"、および "KeyCertSign"。KeyEncipherment は既定のテンプレート "Subordinate Certificate Authority" には含まれておらず、新しいテンプレートでも選択できません。この問題に直面した場合の解決策については、以下を参照してください。 **これはスタンドアロンの Root CA には適用されません**。別名 Offline Root CA です。これらは CSR から正しく Key Usages を取得するためです。
#### 概要
SubCA テンプレートを複製するか、必要に応じて使用できます。その後、CSR に基づいてテンプレート付きの証明書を発行するだけです。この証明書には *誤った Key Usage* (0x86) が設定されます。その後、 `certutil -sign`.
#### 手順
1. SubCA 証明書を要求して発行します。
2. 新しい SubCA 証明書を、Root CA 上のファイル(例: c:\temp\SubCA.cer)にエクスポートします。 **Base-64 でエンコードされた X.509** 形式を選択します。
3. 以下に示す内容で "extfile.txt" ファイルを Root CA(例: c:\temp\extfile.txt)に作成します。
4. コマンド ラインを起動して、次を実行します: `certutil -sign "c:\temp\SubCA.cer" "c:\temp\SubCAwithKeyEncipher.cer" @c:\temp\extfile.txt`
5. 証明書 SubCAwithKeyEncipher.cer には、要求された key usage (0xA6) が含まれます。サムプリント (署名) は変更されますが、シリアル番号は変更されません。
6. ADCS の発行済み証明書の一覧には古い証明書が含まれています。シリアル番号が変わっていないため、古いハンドルを使って新しい証明書を管理できます。たとえば、古い証明書を失効すると、新しい証明書も失効します。これが望ましくない場合は、次を使用して古い証明書エントリを削除できます `certutil -deleterow` その後、次を使用して新しい証明書をインポートします `certutil -importcert`.
#### extfile.txt
```
[Extensions]
2.5.29.15=AwIBpg==
Critical=2.5.29.15
```
## 中間 CA 証明書をアップロードする
1. Azure Key Vault で、証明書をクリックして **Certificate Operation**
2. のオプションを確認できます **Download CSR** および **Merge Signed Request**
%20\(2\)%20\(1\)%20\(1\)%20\(1\)%20\(1\)%20\(1\)%20\(1\)%20\(1\)%20\(1\)%20\(1\)%20\(1\)%20\(3\).png?alt=media)
1. 次をクリックします **Merge Signed Request** を押して、中間 CA 証明書をアップロードします。署名済みの要求をアップロードすると、Azure Key Vault の **Completed**
{% hint style="warning" %}
中間 CA 証明書は PEM 形式 (Base64 エンコード) である必要があります。バイナリ DER 形式を使用すると、詳細に「Property x5c has invalid value X5C must have at least one valid item」というエラーメッセージが表示されます。
{% endhint %}
## CA の適合性を確認する
SCEPman の Status ページでは、新しい構成を確認し、新しい中間 CA 証明書をダウンロードして Endpoint Manager 経由で展開できます。
SCEPman のホームページにアクセスして、CA 証明書がすべての要件を満たしているか確認してください。ホームページで「CA Suitability」の横に何と表示されているかを確認します。たとえば、 *CA Certificate is missing Key Usage "Key Encipherment"*と表示されている場合は、 [中間 CA 証明書を発行する](#issue-the-intermediate-ca-certificate) に戻って証明書の発行を修正してください。
## 中間 CA と Intune SCEP プロファイル
Android プラットフォームでは、Intune の SCEP 構成プロファイルは Root CA を参照する必要があり、中間 CA を参照してはいけません。そうしないと、構成プロファイルは失敗します。Windows では逆で、Intune の SCEP 構成プロファイルは中間 CA を参照する必要があり、Root CA を参照してはいけません。iOS と macOS については、どちらの方法が優れているかについて確実な情報はありません。
---
# Agent Instructions
This documentation is published with GitBook. GitBook is the documentation platform designed so that both humans and AI agents can read, navigate, and reason over technical content effectively. Learn more at gitbook.com.
## Querying This Documentation
If you need additional information that is not directly available in this page, you can query the documentation dynamically by asking a question.
Perform an HTTP GET request on the current page URL with the `ask` query parameter, and the optional `goal` query parameter:
```
GET https://docs.scepman.com/ja/scepman-nodepuroi/intermediate-certificate.md?ask=&goal=
```
`ask` is the immediate question: it should be specific, self-contained, and written in natural language.
`goal` is optional and describes the broader end goal you are ultimately trying to accomplish on behalf of the user. GitBook uses it to tailor the answer towards what is most useful for that goal.
The response will contain a direct answer to the question and relevant excerpts and sources from the documentation.
Use this mechanism when the answer is not explicitly present in the current page, you need clarification or additional context, or you want to retrieve related documentation sections.