> For the complete documentation index, see [llms.txt](https://docs.scepman.com/llms.txt). Markdown versions of documentation pages are available by appending `.md` to page URLs; this page is available as [Markdown](https://docs.scepman.com/ja/zheng-ming-shu-guan-li/static-certificates/addigy.md).

# Addigy

SCEPman を External CA として接続することで、Addigy で証明書を発行します。デバイスは、SCEPman の静的インターフェースと登録済みのチャレンジ パスワードを使用して証明書を取得できます。

SCEPman は次と統合できます [Addigy](https://addigy.com/) SCEPman の静的インターフェースを使用して、外部認証局（CA）として利用できます。チャレンジパスワードを設定すると、登録済みデバイスは証明書を要求し、取得できるようになります。

その他の MDM ソリューションと SCEPman 連携に関する一般的な情報については、 [こちら](/ja/zheng-ming-shu-guan-li/static-certificates.md).

## Addigy 連携を有効にする

SCEPman の連携は、SCEPman App Service 上で次の環境変数を使用して簡単に有効化できます：

{% hint style="info" %}
SCEPman App Service と Certificate Master は、App Service **が** 名前に「-cm」がないものを確認することで区別できます
{% endhint %}

|                                                                                               設定                                                                                               | 説明                                                                                                                                                                                                                 |                  Value                 |
| :--------------------------------------------------------------------------------------------------------------------------------------------------------------------------------------------: | ------------------------------------------------------------------------------------------------------------------------------------------------------------------------------------------------------------------ | :------------------------------------: |
|                     [AppConfig:StaticValidation:Enabled](/ja/scepman-gou-cheng/application-settings/scep-endpoints/static-validation.md#appconfig-staticvalidation-enabled)                    | サードパーティの検証を有効にする                                                                                                                                                                                                   | ***true*** 有効にするには ***false*** 無効にするには |
|             [AppConfig:StaticValidation:RequestPassword](/ja/scepman-gou-cheng/application-settings/scep-endpoints/static-validation.md#appconfig-staticvalidation-requestpassword)            | <p>署名のために SCEPman に送信される証明書署名要求は、この安全な静的パスワードで認証されます<br><br><strong>推奨</strong>: このシークレットは <a href="/ja/scepman-gou-cheng/application-settings.md#secure-configuration-in-azure-key-vault">Azure KeyVault</a>.</p> |       *に保存し、32 文字のパスワードを生成してください*      |
|       [AppConfig:StaticValidation:ValidityPeriodDays](/ja/scepman-gou-cheng/application-settings/scep-endpoints/static-validation.md#appconfig-staticvalidation-validityperioddays) （任意）       | Addigy 経由で発行された証明書の有効日数                                                                                                                                                                                            |                   365                  |
| [AppConfig:StaticValidation:EnableCertificateStorage](/ja/scepman-gou-cheng/application-settings/scep-endpoints/static-validation.md#appconfig-staticvalidation-enablecertificatestorage) （任意） | 要求された証明書を Storage Account に保存し、SCEPman Certificate Master に表示できるようにする                                                                                                                                              | ***true*** 有効にするには ***false** 無効にするには* |

{% hint style="warning" %}
SCEPman の設定パラメーターを追加または編集した後は、App Service を再起動する必要があります。
{% endhint %}

## Addigy の設定

### SCEPman ルート証明書

最初の手順として、SCEPman のルート証明書を展開する必要があります。そのために、SCEPman の Web サイトから RootCA 証明書をダウンロードしてください:

![SCEPman の Web サイト](https://114237723-files.gitbook.io/~/files/v0/b/gitbook-x-prod.appspot.com/o/spaces%2F-LoGejQeUQcw7lqnQ3WX%2Fuploads%2Fgit-blob-9170eb0435726398eb43f6fac8abd0d5f35e8cc4%2FSCEPmanHomePage%20\(1\)%20\(1\)%20\(1\)%20\(1\)%20\(1\)%20\(1\)%20\(1\)%20\(1\)%20\(1\)%20\(1\)%20\(1\)%20\(1\)%20\(2\)%20\(1\)%20\(2\).png?alt=media)

次に、.cer ルート証明書を PEM 形式に変換して、Addigy にアップロードします。そのために次の OpenSSL コマンドを使用できます:

```
openssl x509 -inform der -in scepman-root.cer -out SCEPman-Root-Certificate.pem
```

Addigy で次へ移動します **プロファイル** そして新しい MDM プロファイルを作成し、次を選択します **証明書 - (PKCS12)** をプロファイルタイプとして選び、SCEPman RootCA をアップロードし、PEM 形式のファイルをアップロードします。

<figure><img src="https://114237723-files.gitbook.io/~/files/v0/b/gitbook-x-prod.appspot.com/o/spaces%2F-LoGejQeUQcw7lqnQ3WX%2Fuploads%2FRAcvBOaWt0V089lb96aP%2Fimage.png?alt=media&amp;token=187ce30f-6f6f-4ae0-9b97-cb21713b585b" alt=""><figcaption></figcaption></figure>

### SCEP プロファイル

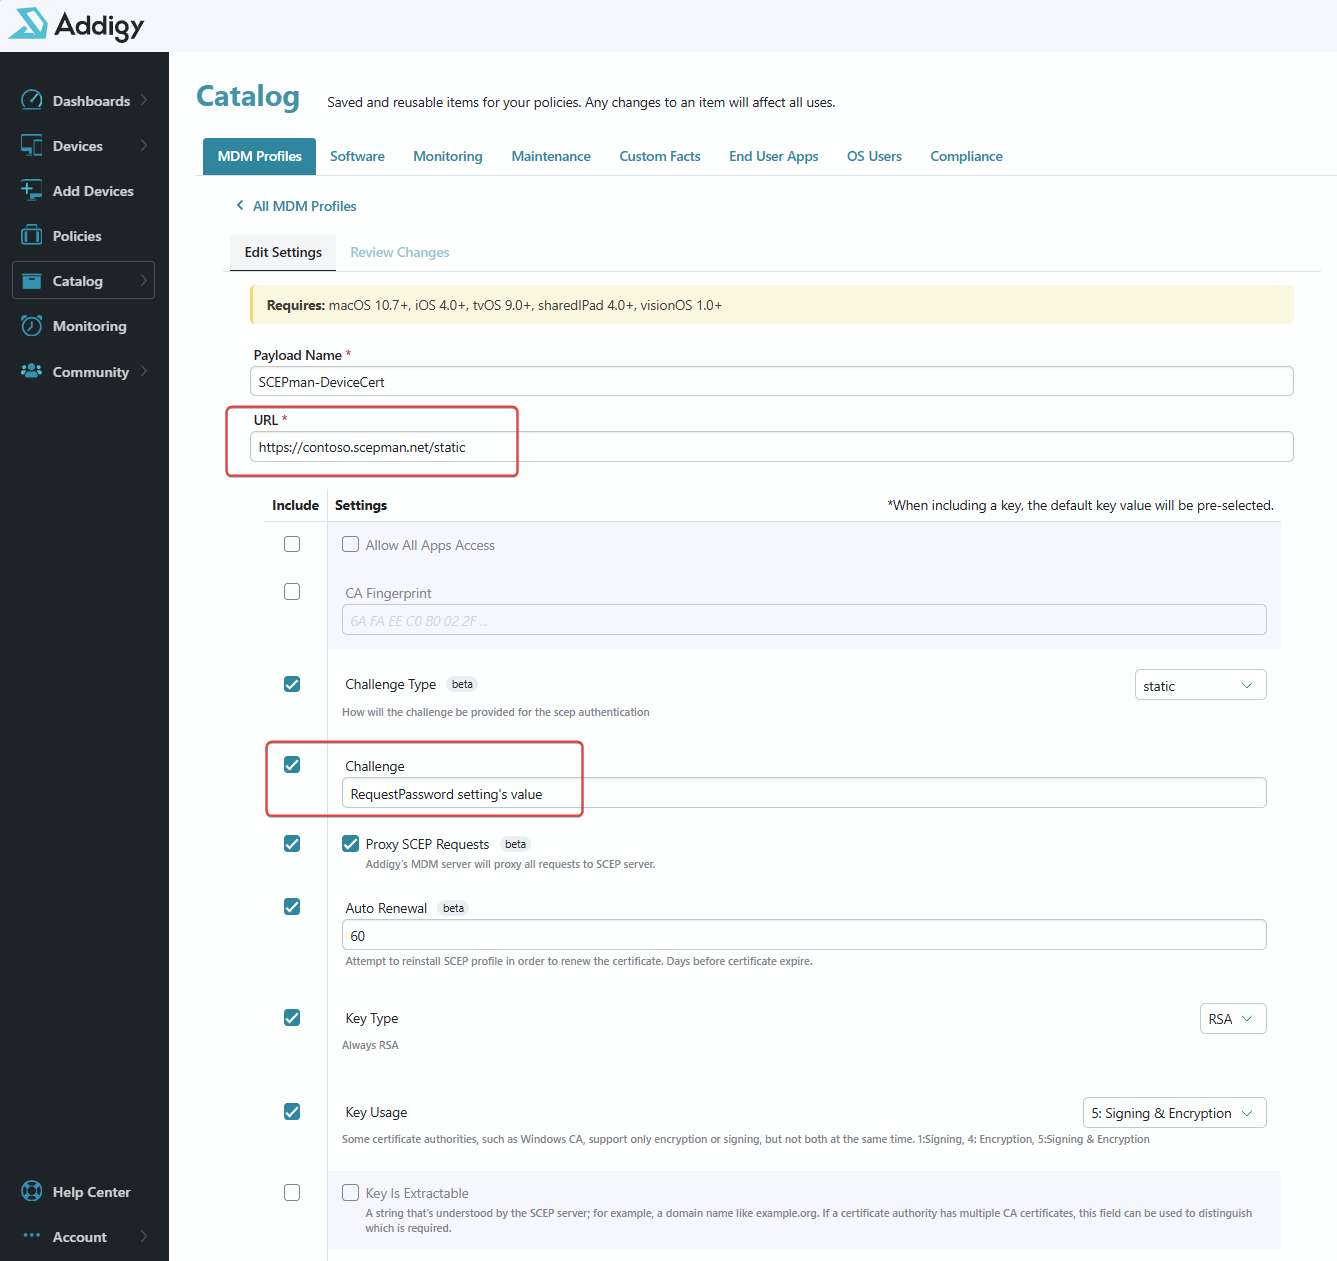
次の手順は、新しい **SCEP プロファイル** を、以下のようにデバイス証明書展開用に作成することです:

* **ペイロード名:** プロファイル名を選択してください。これはクライアント側で証明書プロファイルとして表示されます。
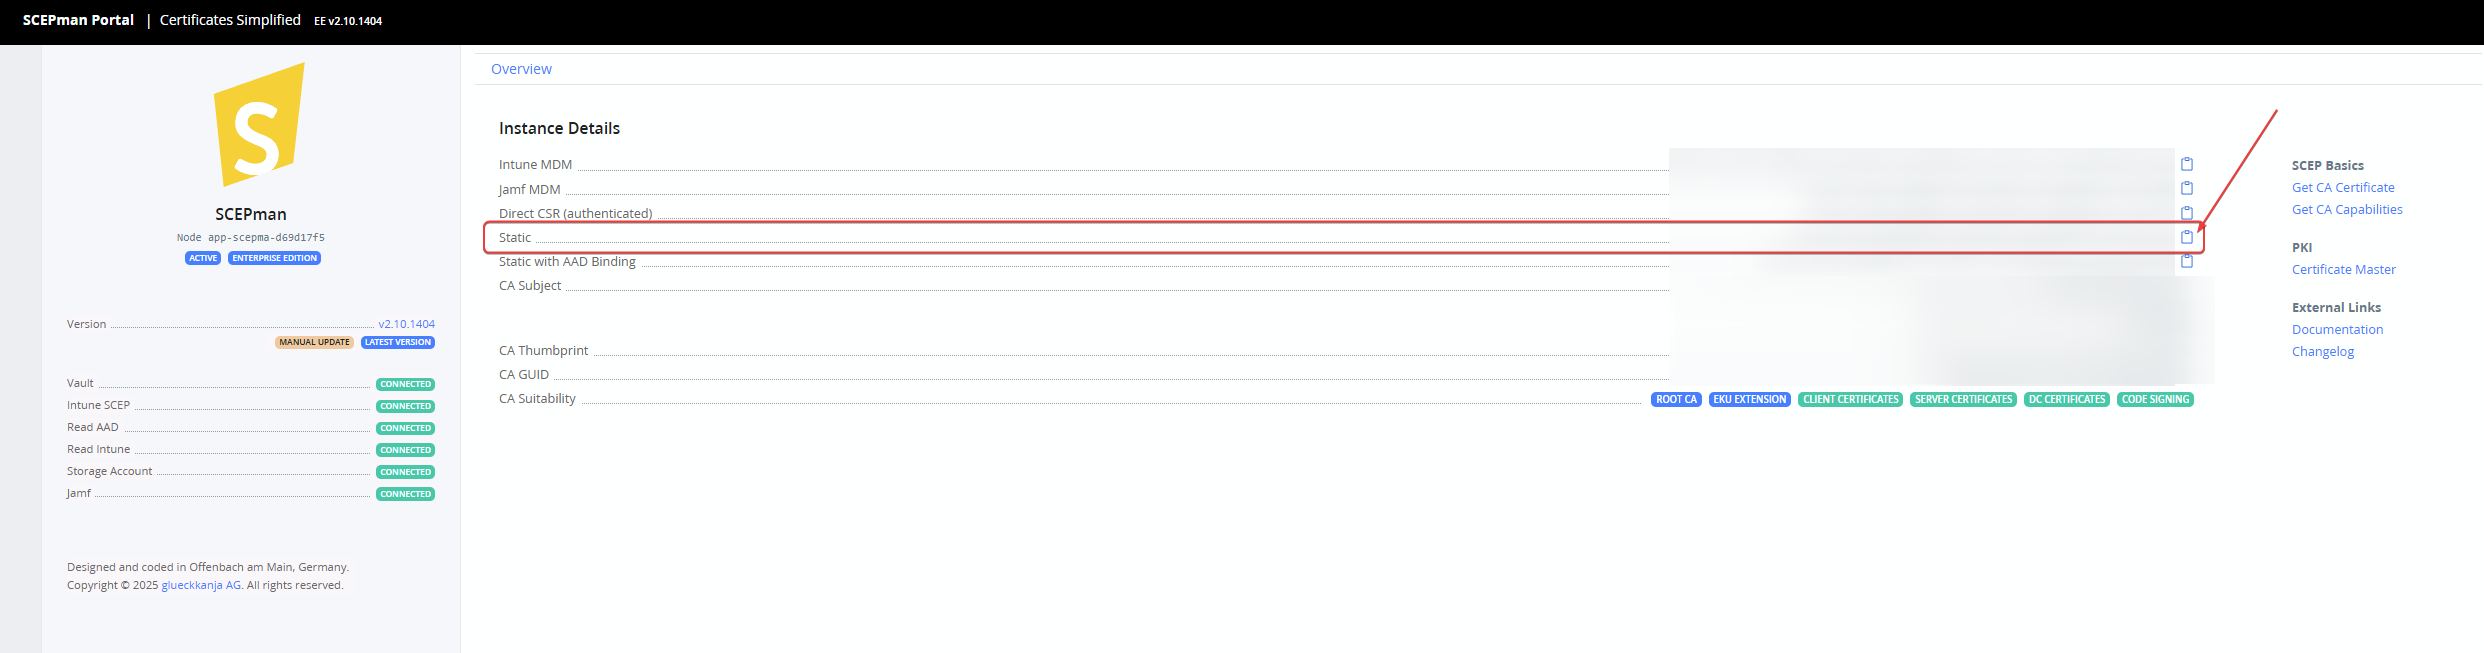
* **URL**: 前の手順で設定した SCEPman の静的 SCEP エンドポイント。SCEPman のホームページから取得できます。以下を参照してください:

<figure><img src="https://114237723-files.gitbook.io/~/files/v0/b/gitbook-x-prod.appspot.com/o/spaces%2F-LoGejQeUQcw7lqnQ3WX%2Fuploads%2FZHNTUBLUO3y3BHH0R37X%2Fimage.png?alt=media&amp;token=a4b0d735-167d-41ea-aa32-2c445325a42b" alt=""><figcaption></figcaption></figure>

* **チャレンジ**：SCEPman の静的 SCEP インターフェースに送信される CSR リクエストを認証するために必要です。これは次と一致する必要があります： [値](/ja/scepman-gou-cheng/application-settings/scep-endpoints/static-validation.md#appconfig-staticvalidation-requestpassword) 設定の *AppConfig:StaticValidation:RequestPassword* 以前に設定したものです。
* 次を有効にします **"Proxy SCEP Requests"** オプション
* 「Signing & Encryption」を次に選択します **Key Usage**
* 残りは以下のスクリーンショットのとおりに入力してください

<figure><img src="https://114237723-files.gitbook.io/~/files/v0/b/gitbook-x-prod.appspot.com/o/spaces%2F-LoGejQeUQcw7lqnQ3WX%2Fuploads%2FIRC4uYWrileRNfteYpIV%2Fimage.png?alt=media&amp;token=4b0f0c81-2c16-4b69-9143-5aed25a87477" alt=""><figcaption></figcaption></figure>

<figure><img src="https://114237723-files.gitbook.io/~/files/v0/b/gitbook-x-prod.appspot.com/o/spaces%2F-LoGejQeUQcw7lqnQ3WX%2Fuploads%2FpKRdVeJYOPm1TUd6c2AY%2Fimage.png?alt=media&amp;token=3b474821-967f-4b6e-968e-812a66d9edde" alt=""><figcaption></figcaption></figure>

Root CA とデバイス証明書の両方のプロファイルを正常に作成したら、それらをポリシーに適用して、割り当てられたデバイスに設定を展開します。

詳細については、次を参照してください： [Addigy のドキュメント。](https://support.addigy.com/hc/en-us/articles/4403542430739-Deploying-Certificates)


---

# Agent Instructions
This documentation is published with GitBook. GitBook is the documentation platform designed so that both humans and AI agents can read, navigate, and reason over technical content effectively. Learn more at gitbook.com.

## Querying This Documentation
If you need additional information that is not directly available in this page, you can query the documentation dynamically by asking a question.

Perform an HTTP GET request on the current page URL with the `ask` query parameter, and the optional `goal` query parameter:

```
GET https://docs.scepman.com/ja/zheng-ming-shu-guan-li/static-certificates/addigy.md?ask=<question>&goal=<endgoal>
```

`ask` is the immediate question: it should be specific, self-contained, and written in natural language.
`goal` is optional and describes the broader end goal you are ultimately trying to accomplish on behalf of the user. GitBook uses it to tailor the answer towards what is most useful for that goal.

The response will contain a direct answer to the question and relevant excerpts and sources from the documentation.

Use this mechanism when the answer is not explicitly present in the current page, you need clarification or additional context, or you want to retrieve related documentation sections.